Components of Pate a Scuree : Superfine sugar gets refined into the powdered with blended in a mixer. The tart dough should be chilled in a freezer for about 10 minutes before getting pressed into flat.
Creme d’amandes
Amount for 2 portion
Salted Butter
50 gram
Powdered Sugar
50 gram
Beaten Egg
50 gram (1 ea.)
Almond Flour
50 gram
Creme d’amandes : Combine each component with the same volume.
Pear Compote
For 2 Pear
Fresh Pear
2 ea.
water
300 gram
White Wine
75 gram
Superfine Sugar
75 gram
Lemon Juice
15 gram
Vanilla Oil
a few drops
Pear Compote : Adjust the volume of sugar between 75 gram and 130 gram as you like.
Fig Cream Cheese Mousse
For 1 tart
Heavy Cream
100 gram
Superfine sugar
15 gram
Cream Cheese
100 gram
Fig puree
100 gram
Powdered gelatin
8 gram
Water (for solvent)
40 gram
Fig Cream Cheese Mousse : In advance, fig puree should be prepared.
Instructions : 調理法
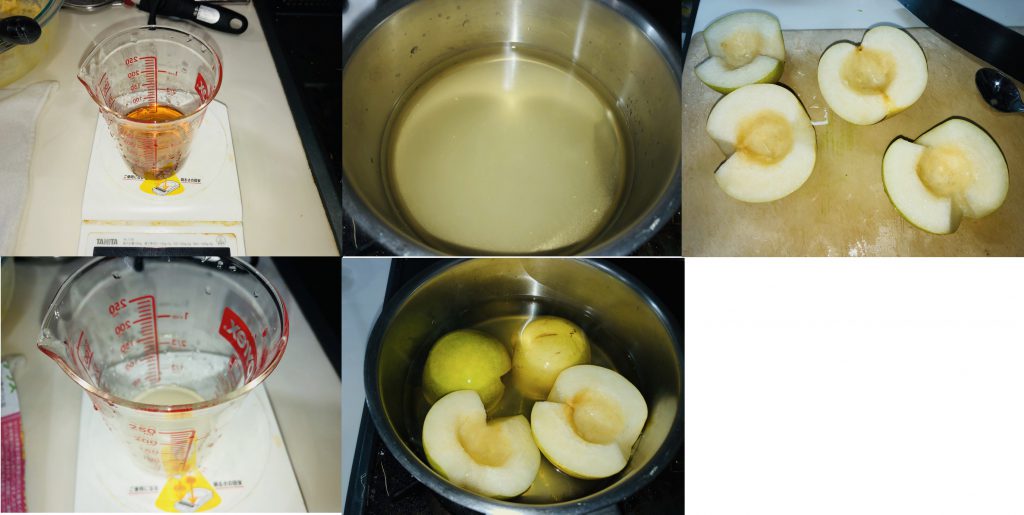
<1>梨のコンポート ① 梨を半部にカットして芯をスプーンでくり抜きます。皮は剥いておいた方が後の処理は楽です。 ② シチュー鍋に水300gグラムと白ワイン75グラム、上白糖75グラムを混ぜて中火にかけます。 ③ 砂糖が完全に解けたら、15グラムのレモンジュース、バニラオイルを数滴加えます。 ④ いったん火を切り、梨を鍋に入れます。再び中火で加熱します。 ⑤ 沸騰したら弱火におとし、鍋蓋をして15分くらい煮続けます。5分おきに梨を上下ひっくり返してすべての面がジュースに浸るようにします。 ⑥ 火を切りクッキングシートを落し蓋として上からかぶせ、室温で冷めるまで放置します。
Making pear compote : ① Cut pear into a half size and remove the center with a spoon. ② Pour 300 gram water and 75 gram white wine, 75 gram superfine sugar into a saucepan and simmer it over medium heat. ③ Once sugar gets completely dissolved, add 15 gram lemon juice and a few drops vanilla oil. ④ Place the pear with cutting side up into the saucepan and simmer it to a boil. ⑤ Decrease heat to low and cap the saucepan to simmer it for about 15 minutes. At every 5 minutes simmer, rotate the pear upside down to sink well in the juice.⑥ Remove from heat and place parchment paper on the surface. Leave it at room temperature.
Making pate a sucree : ① Place 30 gram powdered superfine sugar, 15 gram almond flour, 60 gram butter (cubed) in a middle bowl and press to combine roughly. ② Sieve 50 gram plain flour and 35 gram bread flour over it. Press to combine until the butter gets into the size of rice. ③ Pour 1/2 volume of 1 beaten egg and mix gently with a wooden spoon until the dough settles into shape. ④ On a floured surface of plastic-wrap, place the dough to fold it into the square shape. Roll the dough to flatten. Chill it in a freezer for about 15 minutes.⑤ On a floured surface, roll the dough into the 3 to 5 mm thick which should be larger than a tart pan.Making a pate a sucree : ⑥ Loosely roll the dough around the rolling pin. Place the dough over the tart pan to be unrolled. Dust roughly to push the dough into the corner to remove any gaps. Using a floured spoon, lightly press the dough from the center to margin and flatten it evenly. Cover the rim of the pan. ⑦ Move the rolling pin to and fro along the top of the pan to trim the edges. ⑧ Confirm the dough is tightly attached to the pan with no crack. ⑨ Prick the dough all over with a fork for the air to go through the dough while baking. Chill it in a freezer for about 15 minutes. Meanwhile preheat the oven up to 170C.
Making Creme d’amandes : ① Combine 50 gram butter, 50 gram beaten egg, 50 gram powdered sugar and 50 gram almond flour in a middle bowl until the dough gets creamy and well incorporated. ② Chill it in a fridge until use.
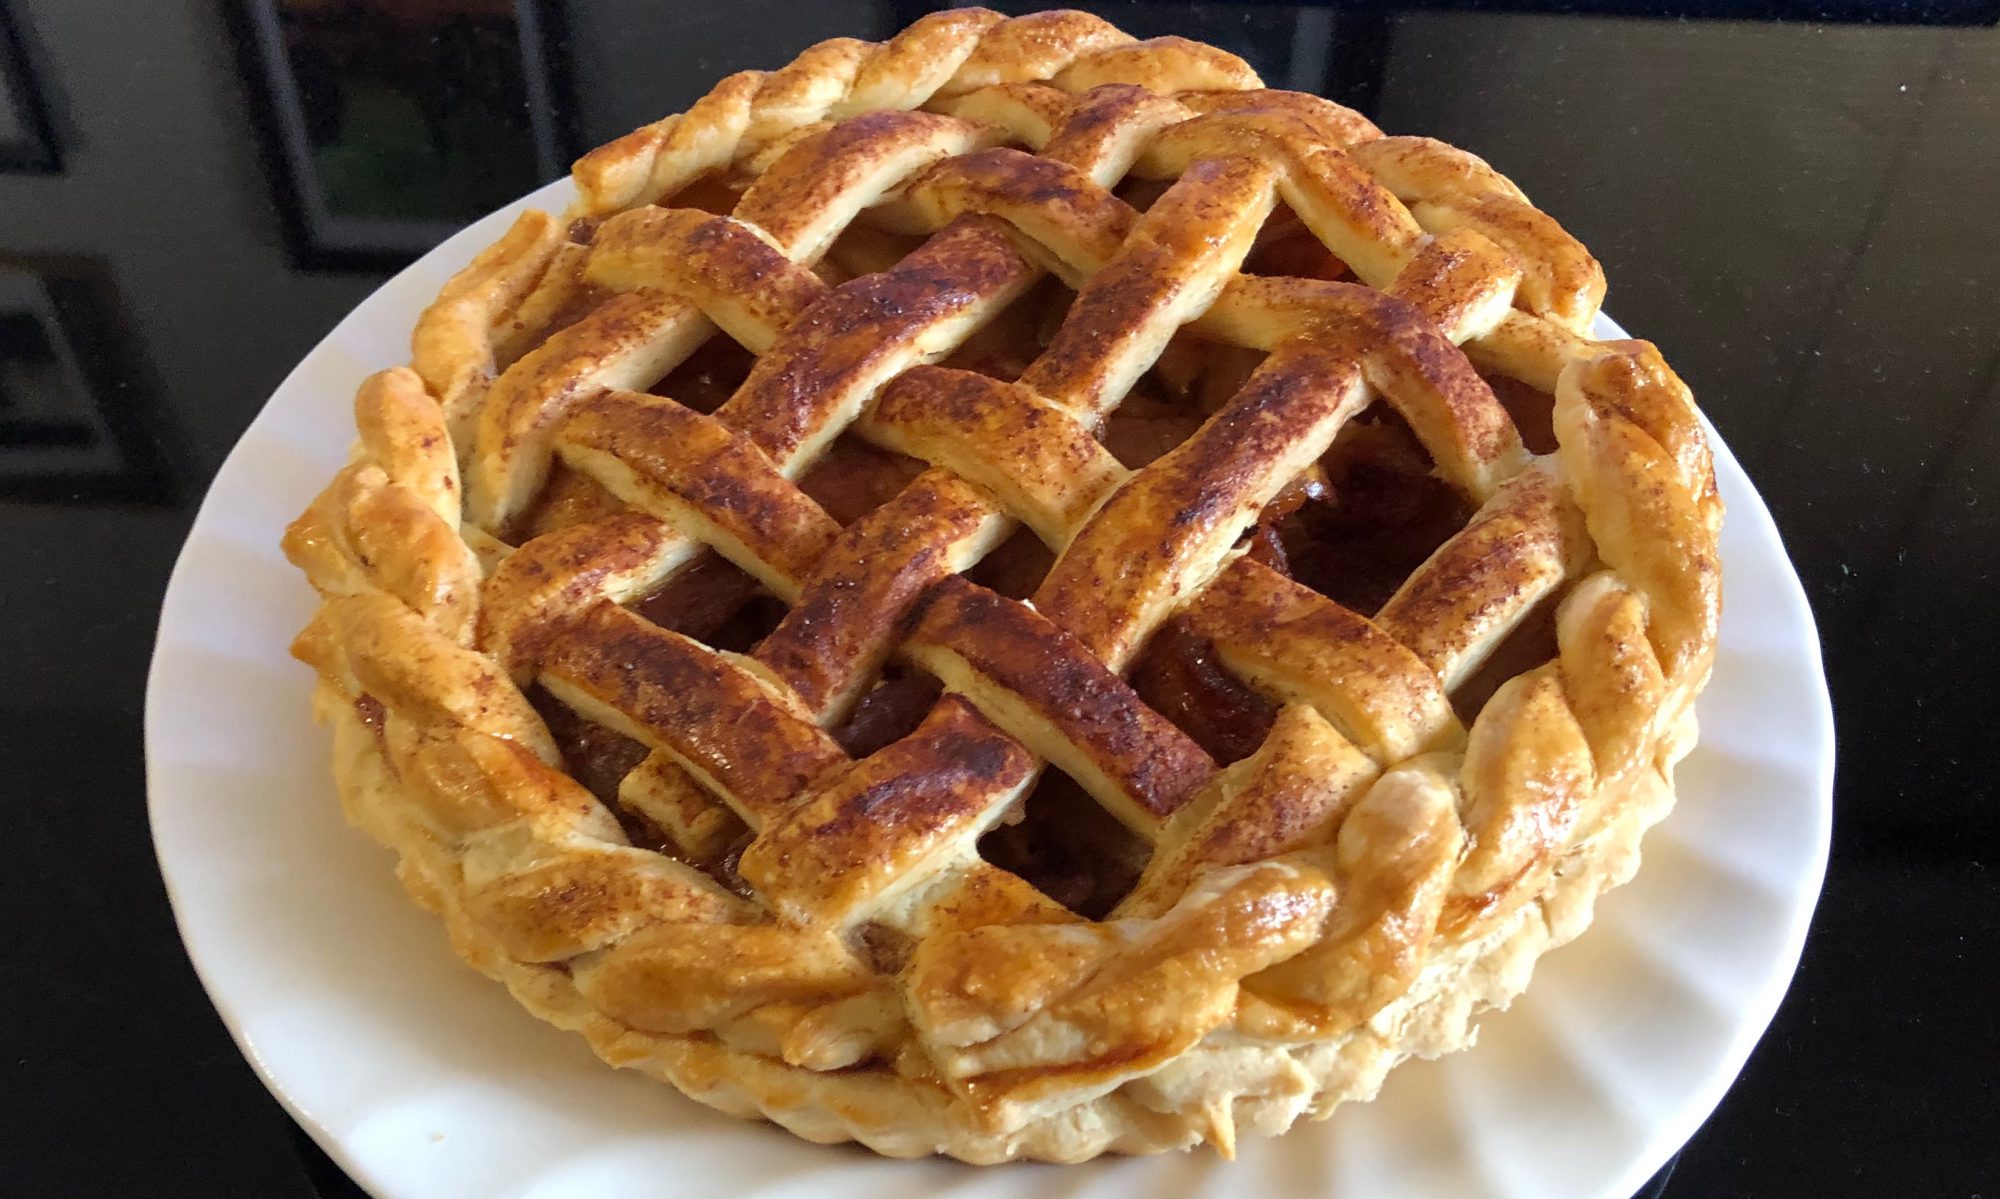
<4>梨のタルト Ver.01
前もってオーブンを180℃に予熱しておきます。 ①冷蔵庫で寝かしておいたタルト皿にアーモンドクリームを充填します。 ②薄切りスライスにしたフレッシュな梨を渦巻き状に盛り付けます。 ③ブラシで表面にエッグウオッシュします。溶き卵1個分を使用しますが、香り付けにダークラムやブランデーを5ml加えて攪拌するか、インスタントコーヒーを加えてコーヒードリュールとするのがいいかもしれません(好みの問題です)。 ④オーブンで180℃ x 30分前後焼きます。途中で表面の焦げ目が強く出るようならアルミフォイルで表面を覆って焼きます。十分に火が通ればタルト皿がモールド(焼型)から浮き上がりますのである程度焼き時間の目安となります。 ⑤濡らしたタオルの上に天板ごとオーブンから出して冷まします。 ⑥タルト皿がの温度が下がってきたら、クーリングラックの上に移動して室温で冷まします。 ⑦焼き型から外して皿に移し冷蔵庫で3時間ほど冷まして完成です。底板をタルトから外す時はパレットナイフを用いて割れないように慎重に分離します。
Pear Tart Version 1 : Preheat the oven up to 180C. ① Fulfill the tart crust with the almond cream (creme d’amandes). ② Slice the pear into 5mm width. Place it as you like ( ie. tornade). ③ Combine 5 gram dark rum and 1 beaten egg. Egg-wash the surface with a brush. ④ Oven-bake at 180C for about 30 minutes. ⑤ Let it cool at room temperature. Then chill it in a fridge for at least 3 hours.
<5>梨のタルト Ver.02
前もってオーブンを180℃に予熱しておきます。 ①芯をくり抜いた梨を少し厚めにスライスします。3等分または4等分に縦割りした梨がお手頃なサイズのスライスになります。 ②タルト皿にアーモンドクリームを充填した後、下図のように梨を盛り付けます。 ③溶かしバター20グラム分を表面にブラシで塗ります。 ④オーブンで180℃ x 30分前後焼成します。 この盛り付け方は、カットした時の断面が美しく梨のタルトではお気に入りです。サムネの写真はこれが上がっています。
Pear Tart Version 2 : Preheat the oven uo to 180C. ① Slice the pear ( previously removed its core ) vertically. ② Fulfill the crust with the almond cream. Place the sliced pear like the second picture with about 60 degrees tilted. ③ Brush the surface with melted butter usually in 20 gram prepared. ④ Oven-bake at 180C for about 30 minutes.
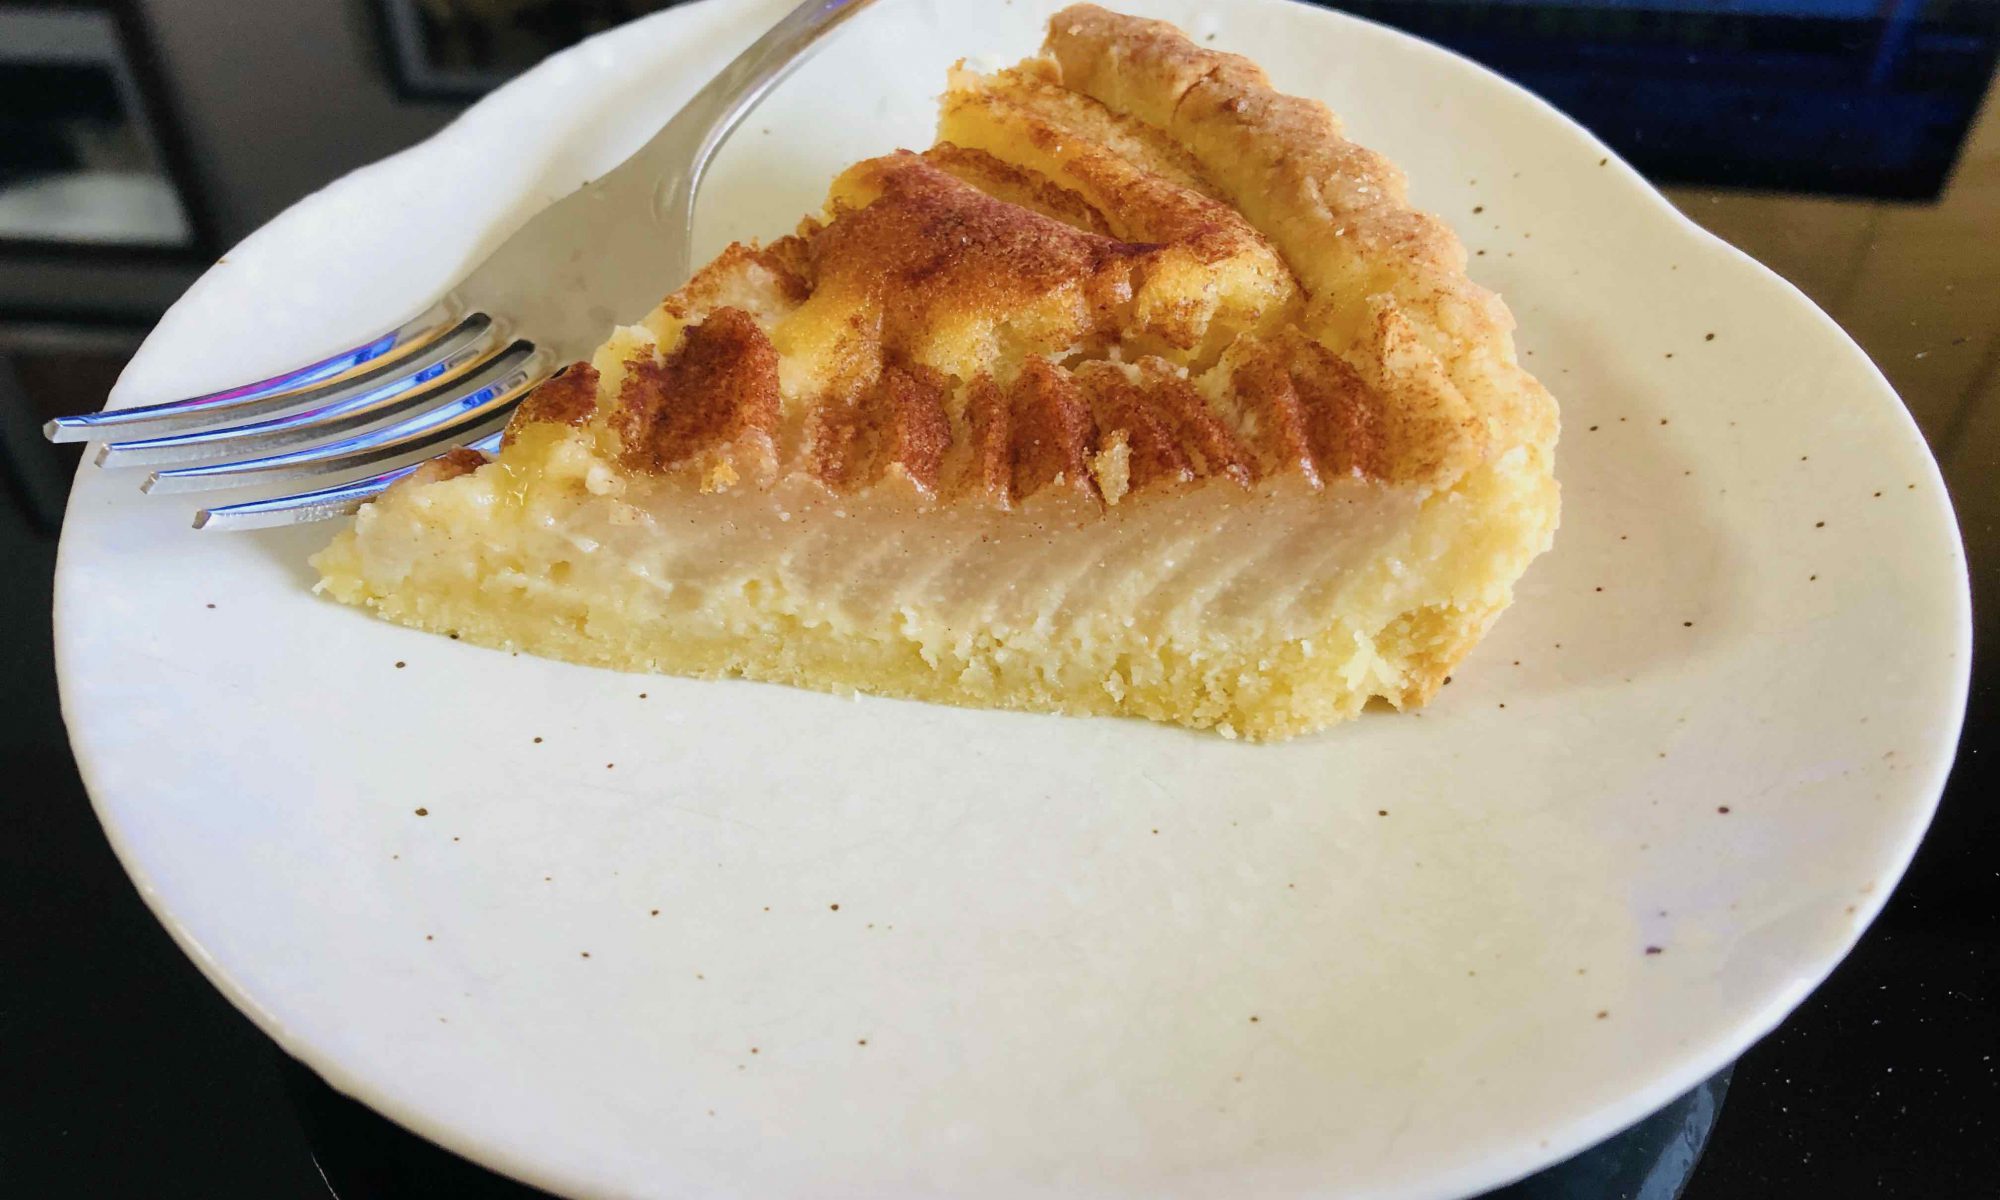
Pear Tart Version 3 : ① Place aluminum foil over the tart crust. Put a ramekin over a plate of a cake pan on the aluminum foil for weight. ② Oven-bake at 170C for 15 minutes. Remove the plate and the foil, add further oven-bake at 170C for 15 minutes. ③ Let the baked crust cool at room temperature. ④ Meanwhile, electric-whisk 100 gram heavy cream and 15 gram superfine sugar in a metal bowl until the firm peak form. Pour 100 gram fig puree and continue electric-whisking until well incorporated. Dump 100 gram cream cheese into it . Electric-whisk until the no streak of the cream cheese can be seen. Pour 8 gram powdered gelatin with 40 gram warm water into the cream cheese to electric-whisk until well combined. ⑤ Fill the crust with the cream cheese mousse. ⑥ Slice the compote pear and place it on the surface of the tart. ⑦ Chill it in a fridge overnight.
3つのバージョンのタルトを作成しました。これらは基本技術の組み合わせ(= Building Method)で構成されますのでこの辺がきっちりしてくると数式を変形するがごとくいろいろなオリジナルな作品を作成できます。
Note that : About 2.5% powder gelatin (weight per total weight) is applied for the cream cheesecake mousse, and 3% for the top gelatin layer, respectively. 5 fold volume of cold water (per gelatin used) should be prepared for blooming although the product instruction suggests to use 10 fold volume for solvent..
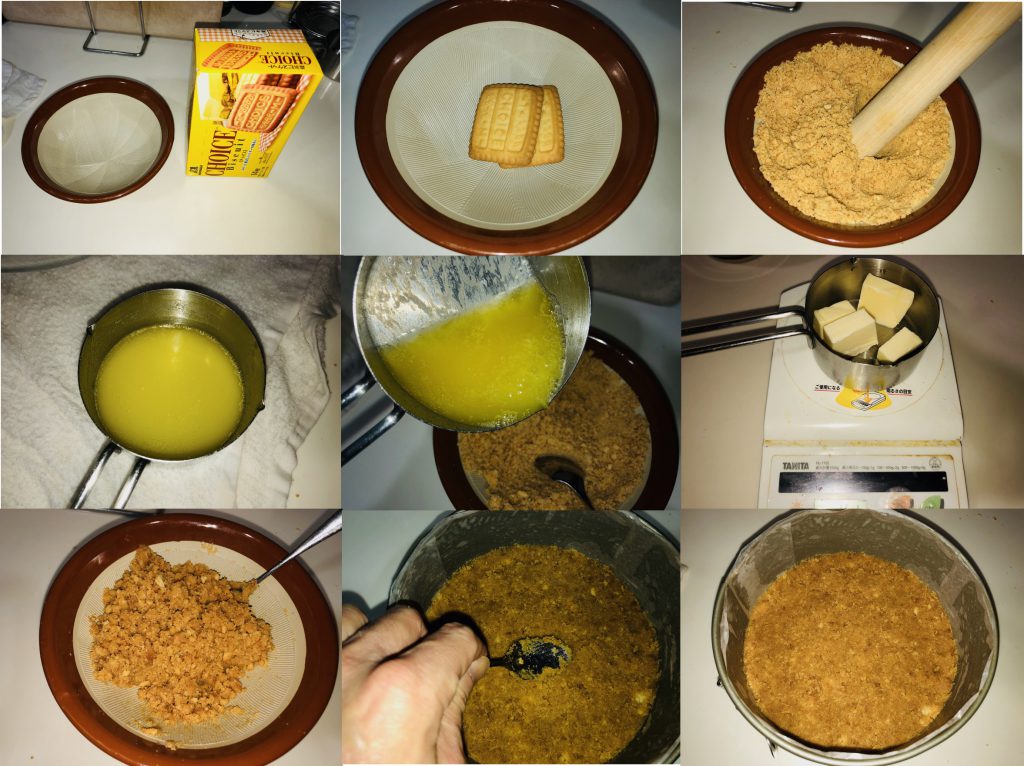
Preparing for Biscuit Plate : ① Line parchment paper on the bottom and side of a φ18 cm cake pan. ② Dump 120 gram biscuit into a mortar to crush into powder with a pestle rod. ③ Pour 60 gram melted butter and mix it well. ④ Place the powdered biscuit on the bottom of the cake pan to press it tightly to be flatten with a spoon. Chill it in a fridge until use.
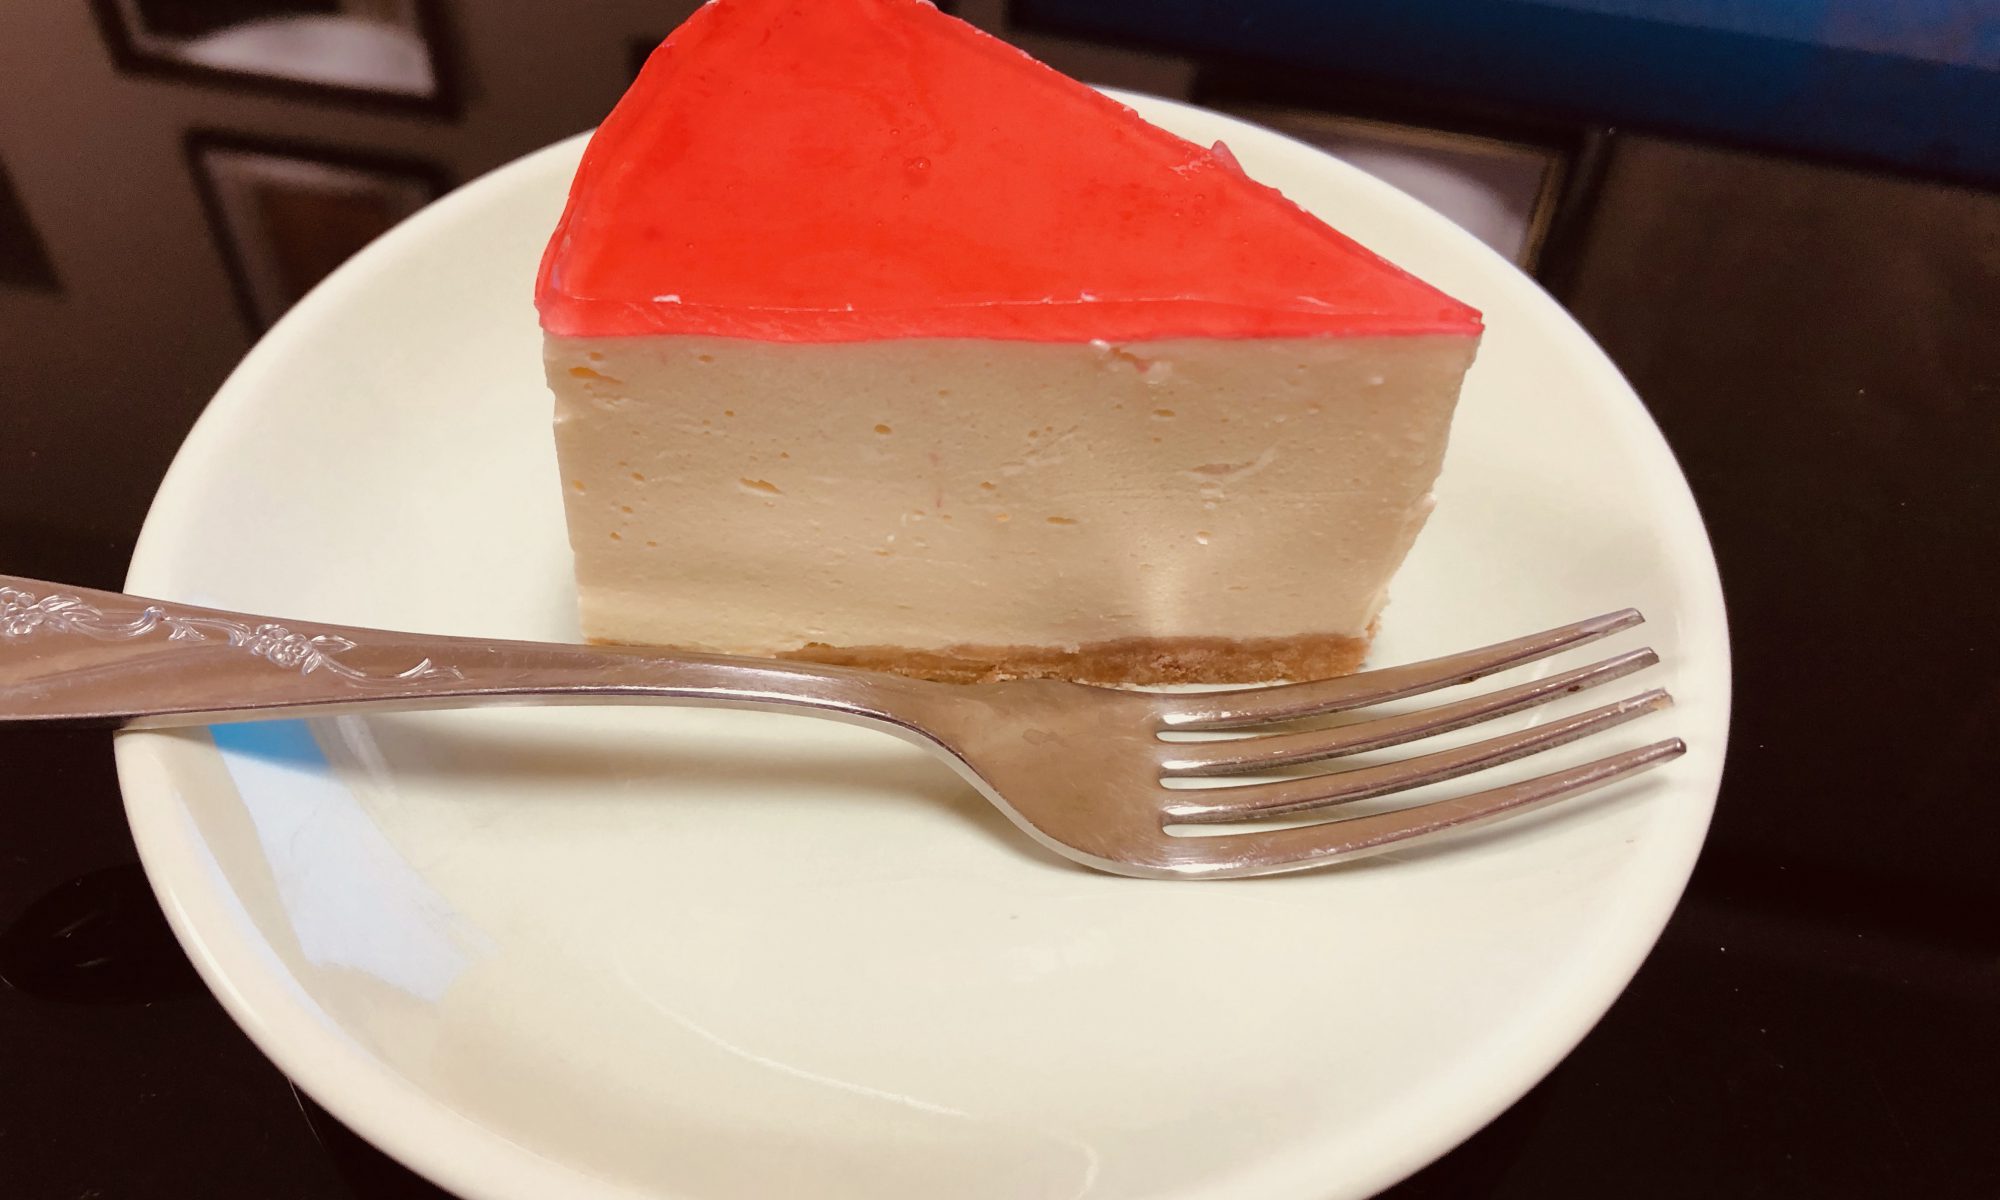
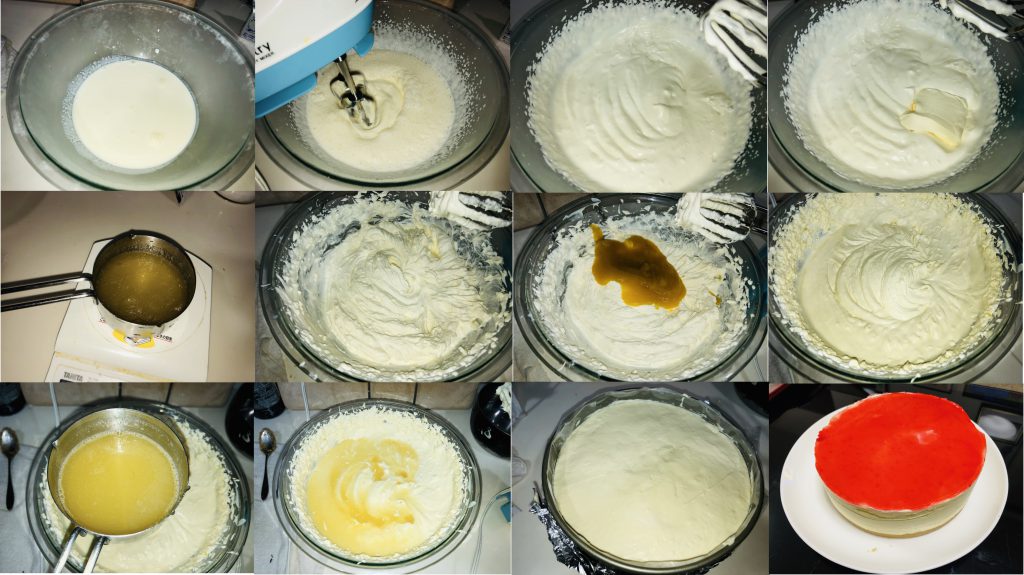
Making Cream Cheese Mousse : ⑤ Pour 200 gram cold heavy cream into a large bowl and add 20 gram superfine sugar. Electric-whisk until the stiff peak form. ⑥ Divide 200 gram cream cheese into 4 parts. Dump the divided cream cheese one by one into the whipped cream and electric-whisk thoroughly until no streak of the cream cheese is not seen. ⑦ Meanwhile, pour 15 gram powder gelatin into 75 gram water and bloom it. Chill it in a fridge. ⑧ Pour 100 gram peach compote into the cream cheese mixture, and electric-whisk until well incorporated. ⑨ Carefully warm the bloomed gelatin to reverse into the liquid form. Pour the liquid gelatin into the cream cheese mixture and electric-whisk until well incorporated, ⑩ Pour the final mixture into the cake pan and flatten the surface with a palette knife. ⑪ Chill it in a fridge until the surface gets firm for about 3 hours. ⑫ Prepare 3 gram gelatin into 15 gram cold water to be bloomed. ⑬ Leave 83 gram peach compote at room temperature and add subtle volume of food color to add vivid red color. ⑭ Warm the gelatin into the liquid, and mix it into the peach compote. Pour the peach compote mixture over the top of the cheesecake. Let it chill in a fridge overnight.
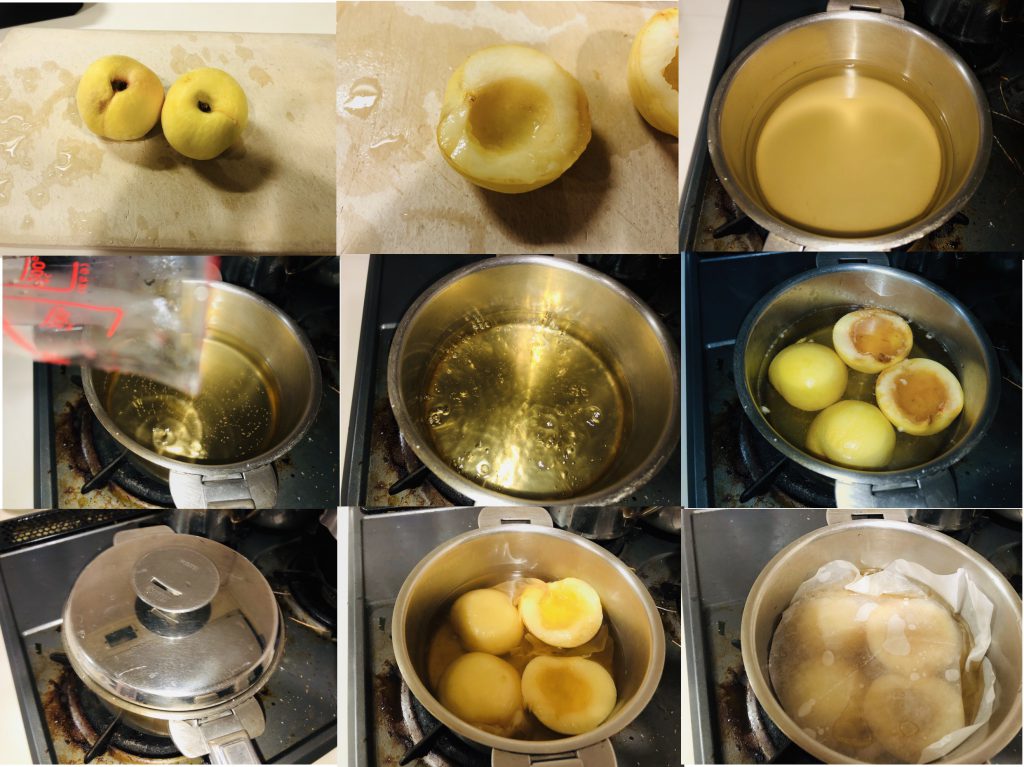
Making Peach Compote : ① Prepare 2 medium sized white peach ( Do not peel away). Cut into the half to scoop out the core with a spoon. ② Pour 75 gram white wine, 300 gram water and 75 gram superfine sugar into a saucepan over medium-low heat. ③ Once the sugar has completely dissolved, add 15 gram lemon juice (100%) and a few drops of vanilla oil to stir well. ④ Turn off a burner and dump all of the divided peaches into the wine-syrup. Again turn on a burner to bring it to a boil over medium heat. Once it has got boiled, put on the lid and get set over low heat. ⑤ Stir every 5 minutes to soak the peaches well into the wine-syrup for about 15 minutes. When the peach gets enough softened to pierce easily by chopsticks, remove from heat. ⑥ Remove the lid, and place 1 sheet of parchment paper as a drop lid deep inside of the saucepan. Let it cool at room temperature. The peach compote has done. ⑦ Separate the peaches from the juice.
Cacao Swiss Roll : Protein percentage has adjusted to about 10%.
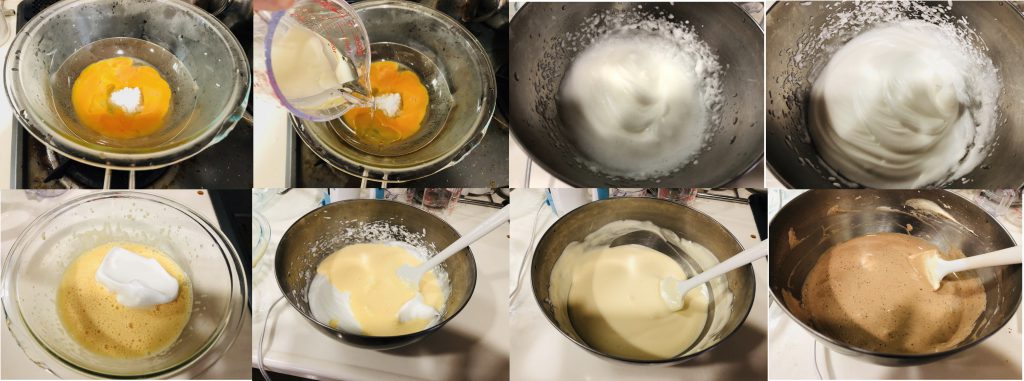
調理法は、スイスロールの常法に基づいて作成しています(See→スイスロール)ので端折ります。Bain-marieで卵黄・砂糖を混ぜ牛乳とキャノラオイルを混ぜます。メレンゲをstiff peakに仕上げたのちgo back methodで混合します。最後に粉類を振るってスパチュラで混ぜでバッターの出来上がりです。
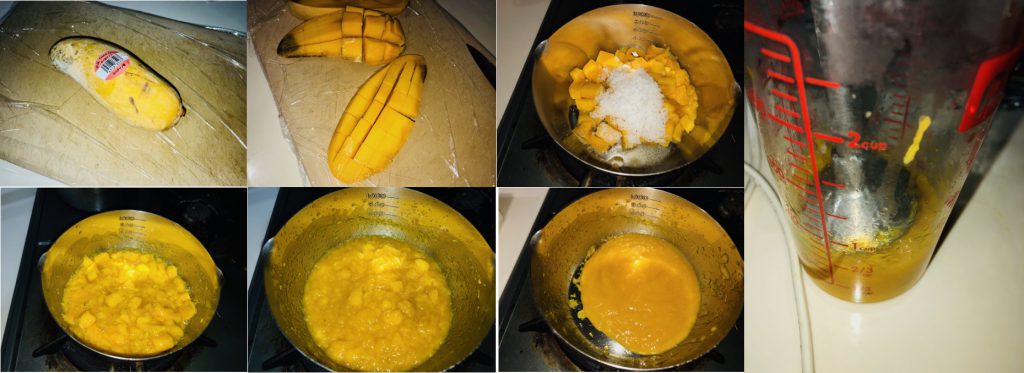
Preparing for Mango Puree : ① Divide the flesh from the core of a mango. ② Dice the separated mango to give a right and left cut on the opposite site of the skin. ③ Warp and cut off the diced pulp to put it into a saucepan. ④ Add 20 gram superfine sugar and simmer it over medium-low heat. ⑤ Pour 5 gram lemon juice and simmer with stirring continuously until the diced pulp gets into thick consistency. ⑥ Transfer into a 500 mL measuring cup and electric-blend until it gets no chunky. ⑦ Return it into the saucepan. Add a few drops of lemon essence and 3 drops of vanilla oil to stir evenly over low heat. Transfer the puree into another cup and chill in a fridge.
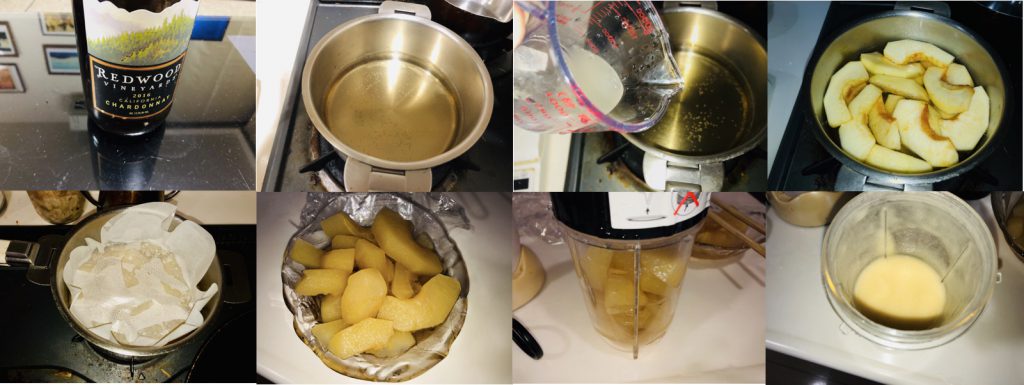
Preparing Apple Compote Puree : ① Prepare 1.5 medium sized yellow apple and peel away. Cut into the half to scoop out the core with a spoon. Then cut into 4 portion of each ( finally, 8 divisions per 1 apple).② Pour 75 gram white wine, 300 gram water and 80 gram superfine sugar into a saucepan over medium-low heat. ③ Once the sugar has completely dissolved, add 15 gram lemon juice (100%) and a few drops of vanilla oil to stir well. ④ Turn off a burner and dump all of the divided apples into the wine-syrup. Again turn on a burner to bring it to a boil over medium heat. Once it has got boiled, put on the lid and get set over low heat. ⑤ Stir every 5 minutes to rinse the apples well into the wine-syrup for about 15 minutes. When the apple gets enough softened to pierce easily by chopsticks, remove from heat. ⑥ Remove the lid, and place 1 sheet of parchment paper as a drop lid deep inside of the saucepan. Let it cool at room temperature. The apple comport has done. ⑦ Separate the apples from the juice. Place the apples into a mixer to blend them into puree.
How to make Condensed Milk : ① Pour 400 gram whole milk and 110 gram superfine sugar into a saucepan over low heat. Simmer it continuously stirring with a wooden spoon or a flower whipper. Stay cautious not to get burned. Once boiling up, hot milk easily gets over a saucepan. Stir continuously to hold it in a saucepan. If boiling up many times, turn down the heat as low as you can get it settled. ② When the the hot milk get thick and a little darker, now is the time to remove from heat. It typically takes about 30 minutes with loosing a half of the volume pre-cooked. Transfer the condensed milk into a heat-durable cup and chill it in a fridge.